Archive for Lesson Plans

TIJ or TCJ – Wooden Toolbox Project

Overall Expectations

A2.1 explain how to correctly and safely use, maintain, and store construction tools and equipment (e.g., hammers, measuring instruments, table saws, mitre saws, drills, lathes, cordless drills);
A2.2 select the most appropriate tools or equipment for specific tasks (e.g., wooden mallet versus framing hammer, crosscut saw versus rip saw, combination square versus framing square);
A2.3 describe commonly used layout, measuring, and tracing techniques (e.g., determining and marking circumference, diameter, radius, angles, rounded corners);
A2.4 describe commonly used temporary and permanent assembly techniques (e.g., temporary: using screws or double-headed nails; permanent: gluing with butt, mortise and tenon, dovetail, or mitre joints).
B1.1 follow the steps of a design process to plan and develop a construction project (e.g., analyse the situation or context; identify the need or problem; generate solutions to address the need; conduct research to determine constraints and availability of materials; build a model; test the model; modify the design as necessary; build the project according to the final design) (see pp. 18-19);
B1.2 use appropriate problem-solving processes and techniques (see pp. 16-19) to address various specific problems or challenges that may arise in connection with a construction project;
C2.1 construct projects in accordance with specifications (e.g., sketches, working drawings, lists of materials);
C2.2 fabricate and/or assemble project components in a logical and efficient sequence (e.g., select appropriate materials and tools,
follow step-by-step instructions);
C2.3 apply appropriate quality-control measures to ensure precise dimensions and correct assembly (e.g., accurate cuts, clean joints, true edges).

Enduring (Key) Learning

Students will gain familiarity in tool usage, but most importantly in this project is interpreting and understanding a drawing and instructions, and careful assembly of a finished product.

Prior Learning

This should be a “later in semester” project so students are comfortable with equipment and able to operate it in a safe manner. Students will build on their use of the miter saws, router table, air nailer and sanding equipment.

Getting Ready

Preparation can be as involved as you would like. Depending on equipment available you could start from rough wood and have the students plane and joint material for the project. This is usually easiest to do in an “assembly line” fashion where all students participate to make all material for the class.

Teaching Strategies/Lesson Content

Handout Page for Wooden Toolbox
Ensure that students are familiar with the safe operation of the woodworking tools needed to complete this project. Ideally a router table that can be set up and left in the same setting will be used for this project in order to save time.
Students will start with their two end boards and complete the woodworking operations required on those pieces. The other pieces of the toolbox are simply flat rectangles so they can be cut at any time.
The long angle cut on the miter saw can be tricky for some students – I have found it best to stand with them and help them complete this part.
I have always found that it is very important to stress that students label their work and store it securely. All of the pieces end up looking the same and it is very disappointing for students when their work goes “missing”.
This project is a nice one to introduce various finishing methods in, and also to emphasize the importance of clean and neat finishing work (especially glue squeeze-out)

Leave a Comment

TGJ 2O0 – Introduction to Camera Use

Overall Expectations

B3.1 apply creative skills, equipment operating skills, and software skills to create components for a media production (e.g., text, video footage, voice-overs, graphics, animations for a video promoting a school event);

B3.2 apply editing skills to integrate the components into a unified and effective production.

D1.2 apply safe work practices when performing communications technology tasks (e.g., use ergonomically designed equipment, keep work area tidy, avoid eye strain, use moderate volume levels).

Enduring (Key) Learning

This activity is meant to start students down the road to careful and thoughtful camera usage. They will begin to learn how to take properly focused images and learn the effects of different lighting conditions on final images.

Prior Learning

Most if not all students have likely taken a picture at least once or twice in their lives, whether with a camera, cell phone or webcam. They will build on this general familiarity with the technology in order to safely and effectively operate cameras.

Getting Ready

This activity can be done with virtually any type of digital camera. You will be instructing the students on the proper use of whatever equipment you have available. As this is an introductory exercise, you will likely want them to use your equipment rather than their own (i.e. cellphone cameras) as the goal is to increase their familiarity with the equipment used in class.

Teaching Strategies/Lesson Content

As I have mentioned, we are going to be starting our work in Photography. We are using Digital SLR cameras to complete the assignments in this class. If you have you own camera or you would rather take your pictures at home or outside of class time, that is fine.

We will complete these assignments in pairs or in groups of three – but each person must take their own pictures (the same picture can not be handed in by more than one person)

There are a few rules that need to be followed in using the cameras:

1. Always wear the neck strap! You should be wearing the neck strap and holding on to the camera with at least one hand at all times. Don’t let it swing around and smash in to things.

2. Don’t disturb other classes in the school. Most importantly DO NOT TAKE PICTURES OF PEOPLE IN OTHER CLASSROOMS UNLESS YOU HAVE PERMISSION FROM THE TEACHER. When you disrupt classes, I hear about it, and it is annoying. Don’t forget, you will have photographic evidence if you do any of this stuff!

3. Don’t take pictures of things that you shouldn’t be doing at school (violence, drugs, etc, etc – I think you get the picture)

4. Take lots and lots of pictures! If the assignment asks for ten pics, take a hundred and pick the best 10. The only way to get better is to practice, practice, practice.

azphoto.JPG
For this assignment you will need to take 26 pictures – one for each letter of the alphabet. Look for signs or shapes that represent each letter of the alphabet from A to Z. You could even try to get people to stand in the shapes of the letters (if that’s even possible).

You can take pictures of actual letter from signs, posters, books, etc OR you can go more abstract (as seen here, for example)

The pics must be nice and sharp – no blurriness, and there should be no glare from the flash – in fact, you shouldn’t even have to use the flash. Avoid getting too close to the letter as the camera will not be able to focus – you can crop it out after the fact if you need to. You’ll need to be about 45 cm away from whatever you are photographing in order for the camera to take a picture.

When you have all of these pictures, assemble them into a single page InDesign document to be posted on your blog (JPG format)

It’s not a race – if you take a bunch of pics and realize that they need more work, feel free to go out and get more.
Remember to conduct yourself in an appropriate fashion while out in the school taking pictures. Stay within the allowed areas, take the pictures you need and return to the classroom ASAP. Don’t linger or hang out in the Student Square or the Caf.


Leave a Comment

TMJ – Hand-Forged “J” Hook

This J-Hook project is a good introduction to metal shaping using heat (torch or forge) and rudimentary blacksmithing using hammer and anvil.

This project will require students to use a cutting tool (can be as simple as a hacksaw), a forge or torch, anvil and hammer and a drill press.

Click here for an illustrated PDF handout for this project.

Expectations met with this project:

B2.1 identify and select appropriate materials required to manufacture a product;

B2.2 develop a process plan for the manufacture of a product (e.g., create a work plan, identify appropriate tools and equipment, produce a bill of material, develop a budget for the project);

B2.3 use correct procedures to prepare materials for the manufacture of a product (e.g., layout, cutting to rough length, squaring, drilling, weld preparation, deburring);

B2.4 use appropriate methods of assembly (e.g., joining, bonding, crimping, fastening) based on design criteria and specifications.

Leave a Comment

TIJ or TMJ – Sheet Metal Box Template/Construction

Attached is a basic template to be used in the construction of a sheet metal box.

Students will learn the importance of accurate measurement and layout as well as the use of basic sheet metal cutting and bending tools.

This is an excellent first “getting your hands dirty” type of project for students in grade 9 or 10.

Tools needed are sheet metal hand shears, a box and pan brake and a spot welder (rivets or other mechanical fasteners can be used but the result is not as polished.

sheet metal box

Leave a Comment

TGJ 2O0 – Desktop Publishing – Menu Design

Overall Expectations

A1.2 demonstrate an understanding of design elements (e.g., line, form, colour, texture, space) and principles (e.g., balance, rhythm, proportion, contrast, flow);

A1.5 identify different types of communications software used to create communications technology products and services (e.g., software for photo, audio, and video editing, animation, page layout, web page creation, and computer graphics) and describe how they are used.

B3.1 apply creative skills, equipment operating skills, and software skills to create components for a media production (e.g., text, video footage, voice-overs, graphics, animations for a video promoting a school event);

Enduring (Key) Learning

This assignment should provide the beginning of a full understanding of the elements of graphic design, particularly page layout and design. The four principals of C.R.A.P will be the main takeaway from this lesson.

Prior Learning

Most students will have produced documents using a variety of desktop publishing software but most have not considered elements of design in doing so. Their prior knowledge in desktop publishing will help them along the road to quality document design.

Getting Ready

This lesson will build on the introductory lessons you have presented in desktop publishing (in my case this is InDesign). Students should have a good handle on the mechanics of page layout in whatever software you are using.

Teaching Strategies/Lesson Content

If you had your own restaurant, what would be on the menu? Would it be a fancy fine dining affair or a fun, kid-friendly burger joint? What would your restaurant be called? You can come up with a completely original idea or modify something that already exists.

Design a menu for a restaurant that includes at least 10 items with descriptions and prices. Include pictures for some but not necessarily all – that’s your choice.

Need some inspiration? Here is a Google image search for restaurant menu. Most of these are pretty plain – I’d like you to spice yours up with appropriate images and graphics.

Remember your design principles:

Contrast:  How will you make your items stand out? Will the name of the restaurant stand out from the rest of the page?

Repetition:  Choose one or two fonts to use throughout the menu. Use bold or italic if you need to make something stand out. Select colours that you can use throughout your design.

Alignment: How will you organize your menu items? Will you place them neatly in columns? Where will the images go?

Proximity: How will you group similar items (desserts, main dishes, etc)?

Your font selection is key here. This is the easiest way to give your reader an idea of what sort of experience they will have in your restaurant.

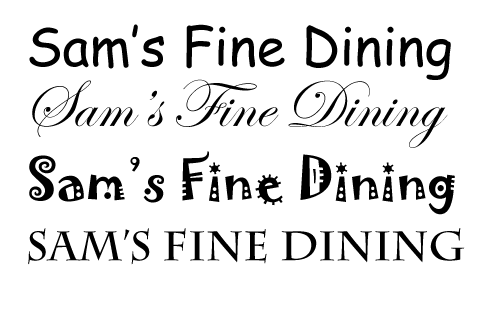
Check out the following graphic for an example of how a font change can completely change the feel of text:

samsfinedining

The top text (which is Comic Sans, and should never be used, ever!) is very informal and relaxed. The second is a script type font which is much more refined and formal. The last two are along the lines of the first, but are a little more serious. This is something that you will have to experiment with in order to develop your own style. Always make sure that the fonts you are choosing are readable though!

Leave a Comment

TMJ – ARC Welded Stump

This PDF is a handout for the classic “ARC Welded stump project” for use in a manufacturing class.

Students will be required to use safe operating procedures on cutting, welding and grinding equipment.

This is a good introductory welding project, suitable for use at the Grade 10 level in manufacturing.

Click here to download “Arc Welded Stump Handout PDF”

Expectations met by this project:

B3.1 set up hand tools, machine tools, power tools, and equipment (e.g., jigs and fixtures, clamps, engine lathe, welding equipment, milling machine, drill press, injection-moulding machine) properly in preparation for the manufacture of a product (e.g., robotic challenge, design challenge, fabrication project);

B3.2 use various hand tools, power tools, machine tools, and related equipment (e.g., saws, grinders, milling machine, engine lathe, welding equipment, vacuum-forming machine) safely and correctly to manufacture a product;

B3.3 use the proper procedures for maintaining and storing materials, tools, and equipment;

B3.4 demonstrate safe workplace practices and behaviours (e.g., follow instructions, keep work area clean and dry, don’t distract other workers) when using materials, tools, and equipment to manufacture a product.

Leave a Comment